Are you wondering if we removed that popcorn ceiling after all?
The answer is yes, and as expected the newly exposed ceiling surface is anything but smooth and ready for paint.
Welcome to Week Three of the One Room Challenge® and our project to update a dated 1970s bathroom with a classic vintage style character.
This week’s update is mostly covered in dust.
Lots of ceiling dust and wall repairs are in process. I guess you can say we are truly in the messy middle of this project and we wonder why we started this part of the project in the first place.
This post contains affiliate links that support this blog at no additional cost to you. I hope that you find something inspiring for your home through these links.


We removed the popcorn ceiling – now what?
After renovating four houses, I have yet to find a good reason for a popcorn ceiling, except the obvious reason to disguise the imperfect surface of the original sheetrock surface of course.
Which I know is part of the main reason why they were so popular in the middle of the last century. Textured ceilings were cheaper on a builder than trying to create a smooth surface, and there was the added benefit that they were supposed to reduce noise in a room.
I imagine they just became the norm for new houses back in the day and most new owners didn’t question it. The house we rented in San Antonio for three years had textured walls too. I was not too fond of those and thought they were strange. But in that area, it was the norm.


Even as a kid, I thought the different patterns in other houses were interesting but always looked dusty. That opinion has been supported more and more in each older home that I have lived in or worked on.
Keeping the original textured ceilings dates the interior of the house so much.
As we have been slowly working on our house, I have been trying to remove each popcorn ceiling along the way.
It is a messy, dusty, and frustrating project trying to get smooth ceilings after a popcorn texture has been applied, but still worth it in the end.
To remind you of where we started with this project, I am resharing the photo below from the beginning.

The walls were blue, the flooring was a stained and holey carpet, and all of the trim and doors were a faded black stain. The built-in bench was too narrow to actually sit on or use so it was a catchall and dusty most of the time.
The ceilings should have been the first item on our list.
In reality, we know we should have started with the ceilings first on this project. Common sense is that you start at the top of the room and work your way down. I know this, my husband knows this, and you probably are thinking this as well.
So why didn’t we? Glad you asked.
Because of the holes in the existing carpet. Remember how I mentioned that the pet rabbit had chewed some holes in the carpet to take the fibers back to her cage for bedding? With three grandkids running around in their bare feet or crawling on their hands and knees they could get hurt. The sharp carpet tack strips were exposed. I would have felt awful if any one of them hurt their feet, hands, or knees on those floors. So we rushed to get the floors done before the holidays.
Good decision at the time.
However, like most designers with a vision of a more beautiful bathroom, I couldn’t ignore my desire to get rid of those popcorn ceilings even though we had already started painting the bathroom walls. My original dream of a more modern bathroom did not include a textured ceiling.
Now we are repeating part of the renovation process on the walls because I asked to have the popcorn ceiling removed anyway. I owe my husband for this one! My payback will be cleaning up the walls a second time for the repainting of the walls.
Removing a popcorn ceiling is usually very easy using a spray bottle with water and a metal scraper. And that is how this one was removed.
As expected, removing the texture revealed its unsightly problems.
We have to solve a few problems with a slight sloping in the sheetrock in a few areas and this very large hole from the old exhaust vent.
Obviously, we want to replace that old exhaust fan with one with a more modern design. So far we haven’t found one that will double as a light fixture and exhaust that will also cover that large of a hole. It also needs to be a good accent with the new light fixtures at the bath cabinet.

Most designers suggest treating the ceiling like a fifth wall. Especially if you want the ceiling to be a big focal feature in the overall design.
That is not my plan for this bathroom renovation.
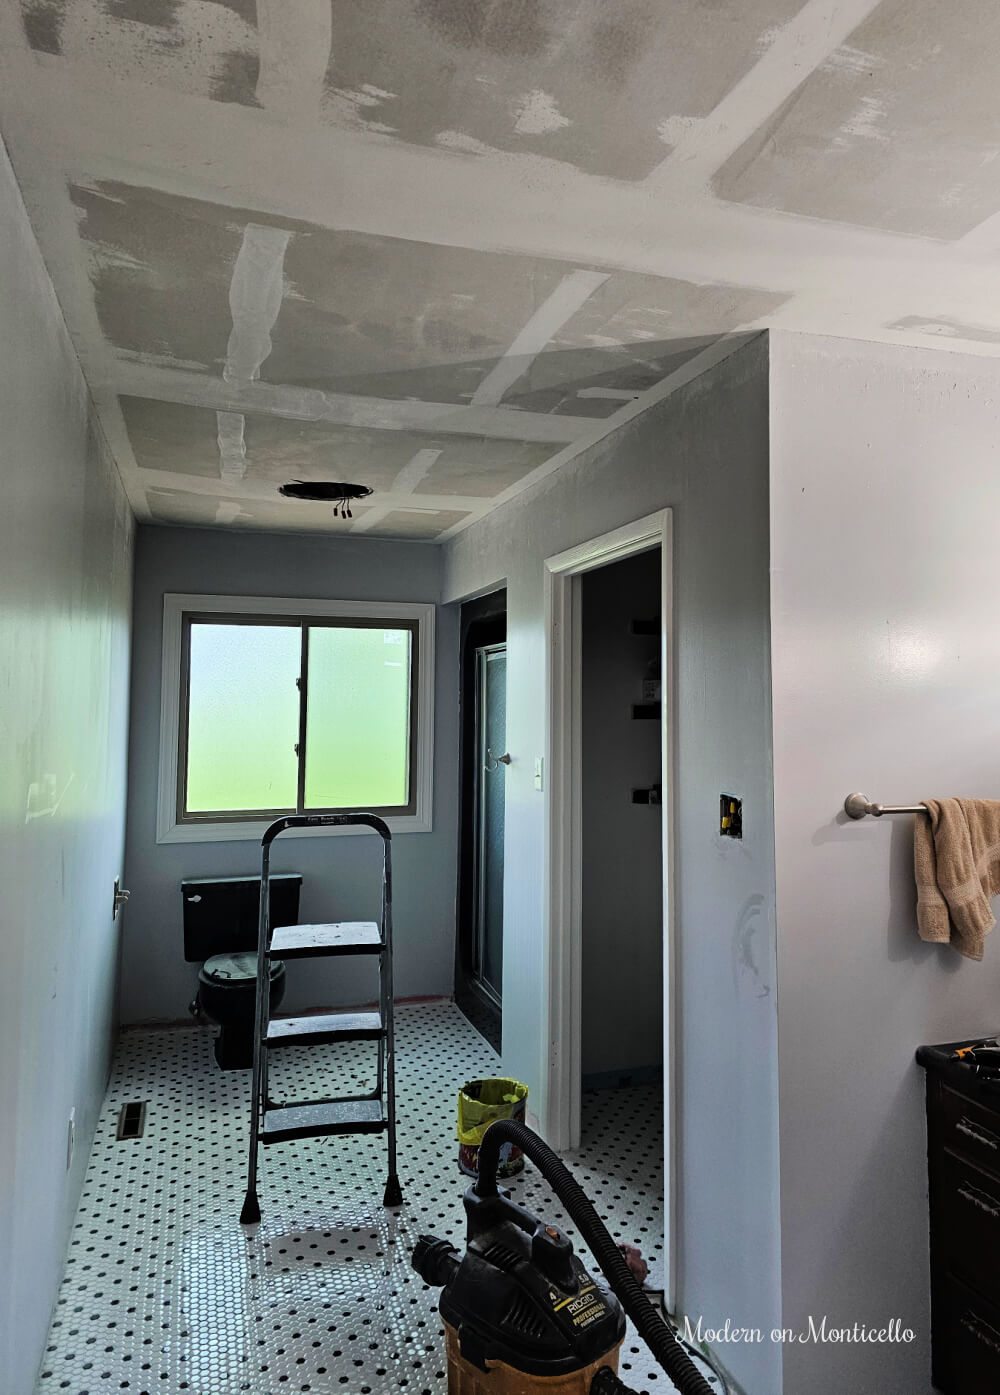
My original plan is this will be a white ceiling with maybe just a little bit of visual interest that doesn’t compete with the vintage tiles on the floor. It needs to be something more than just a fresh coat of paint to make it look better.
We have been discussing whether to install beadboard on the ceiling, wood strips in a square pattern to mimic a coffered ceiling or even wallpaper.
Honestly, none of those feel like a good idea yet. I can’t deny that white paint may be one of the best ceiling ideas to stay within the budget.
Since I don’t want the ceiling to be a focal point, we are still discussing the best option for the new ceiling at the time I am writing this post. Stay tuned to see what we decided was the best option for our time frame and budget next week.
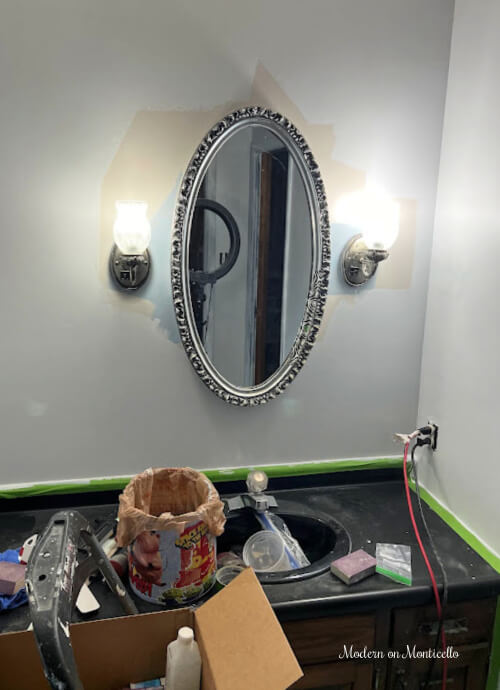

Besides taking down the popcorn texture on the ceiling, this week my husband also finished the sheetrock work to fill in the large opening in the wall left by removing the previous medicine cabinet mirror. Since this will be a guest bathroom, it doesn’t need a medicine cabinet.

While he has been busy with the repair work on the ceiling and walls, I have been working on some of the final design details to finish the room. I already know what I plan to do to update the existing bath cabinet, but the inside of the closet is the challenge I am trying to figure out to give it a surprise design feature.
It could be fun to paint the inside of the closet in different colors that will also be featured in the bathroom decor throughout the room. Also under consideration is covering the back wall in the closet with a vintage-inspired black and white wallpaper. Peel and stick wallpaper of course.
Paint or wallpaper? Which one would you choose?
Even though we are making progress on the makeover of this dated 1970s bathroom, this week kind of feels like a step backward. As I look at the room covered in ceiling dust and its half-painted and patched walls, I can admit to a bit of frustration with the progress. We have been at this point before while tackling a DIY project.
This weekend we will take a deep breath, roll up our sleeves, and get back to it as always.
See you next week!

Ephesians 6:13 Therefore put on the full armor of God, so that when the day of evil comes, you may be able to stand your ground, and after you have done everything, to stand.
Other posts in this One Room Challenge Series:
Adding Vintage Charm to our 1970s Black and White Bathroom
Best Choice For Vintage Style Bathroom Tile
Checklist Update for our 1970s Vintage Bath Remodel
New Lighting and Mirror in our Vintage Bath Remodel
1970s Bathroom Makeover – The Reveal